Making your own bread at home can seem like a very difficult task if you have never tried it before, but this wonderful pocket flatbread recipe is designed to change your mind completely. This recipe is all about creating a soft, round, and delicious bread that magically puffs up while cooking to create a completely hollow space right inside the middle. This amazing hollow space is what we call the pocket, and it serves as a natural pouch that is ready to hold any delicious fillings you can imagine. The entire process relies on very basic ingredients that you likely already have sitting in your kitchen cupboard right now, such as simple flour, water, yeast, a little bit of salt, and some oil. You do not need any expensive machines or complicated bakery equipment to achieve a perfect result because your own two hands and a hot pan will do all the hard work for you. It is a beautiful cooking tradition that has been passed down through many cultures for thousands of years because it is reliable, simple, and incredibly satisfying to make from scratch. By learning this recipe, you are opening up a whole new world of home baking that will make you feel confident and proud every single time you see the dough rise.
People all over the world absolutely love this specific type of bread because it is incredibly fun to eat and offers a texture that is unmatched by regular sliced bread. The outside of the flatbread becomes beautifully golden with little brown spots from the heat, while the inside remains amazingly soft, pillowy, and tender to the bite. Kids and adults alike are fascinated by the magic pocket because it turns an ordinary lunch sandwich into an exciting edible pocket that securely holds all your favorite ingredients together. Unlike standard bread slices that often tear apart or let juicy sauces leak out of the sides, this flatbread acts like a neat pouch that keeps your vegetables, meats, and spreads perfectly contained. People also adore the incredible aroma that fills the entire house while the bread is cooking on the stove top or baking inside the hot oven. That warm, earthy smell of fresh yeast and cooking dough creates an instant feeling of comfort and happiness that draws everyone straight into the kitchen to see what is happening. It is a crowd pleasing food that brings people together because you can place a warm stack of them in the middle of the table and let everyone tear them open to build their own custom meals.
You should definitely make this recipe whenever you feel the need to slow down your busy life and experience the emotional joy of creating something beautiful with your own hands. The process of mixing the flour and water together, feeling the sticky texture change, and kneading the dough on a clean counter top is a wonderful way to relieve stress and practice mindfulness. It is the perfect activity for a quiet rainy weekend afternoon when you want your home to feel extra cozy, warm, and filled with delicious smells. You can also make these flatbreads for special family gatherings, casual backyard picnics, or fun dinner parties where you want to impress your guests with fresh food made from scratch. From a taste perspective, there is simply no comparison between a store bought flatbread that has been sitting on a shelf for days and a warm, fresh one that you just pulled out of your own pan. The homemade version tastes clean, rich, and incredibly vibrant, making it an instant upgrade to any morning breakfast, afternoon lunch, or evening dinner that you prepare for yourself or your loved ones.
In addition to the emotional benefits and the superior taste, this recipe is a fantastic choice for anyone who is currently focusing on their physical fitness and long term health goals. When you buy packaged bread from a regular grocery store, you are often consuming hidden preservatives, artificial chemicals, processing agents, and high amounts of refined sugars that are added to extend shelf life. By preparing this flatbread in your own kitchen, you gain total control over every single ingredient that enters your body, ensuring a clean and wholesome fuel source for your daily activities. It provides clean energy through complex carbohydrates, which is exactly what your muscles and brain need to stay strong, focused, and energized throughout a demanding day or a tough workout session. You can easily pair these pocket breads with lean proteins like grilled chicken, healthy fats like creamy avocado, and plenty of fresh crisp vegetables to create a perfectly balanced meal that aligns with your fitness journey. It is a wonderful way to enjoy comforting carbohydrates in a controlled, mindful manner without compromising on your health values or your weight management plans.
Ingredients You Will Need
To begin this baking adventure, you will need to gather a few simple ingredients from your kitchen pantry. Please ensure that all your measurements are accurate so that the dough forms perfectly and creates that beautiful inner pocket.
-
Two teaspoons of active dry yeast
-
One cup of warm water at a comfortable temperature
-
One teaspoon of white granulated sugar
-
Three cups of all purpose white flour
-
One teaspoon of fine sea salt
-
Two tablespoons of pure olive oil
Step By Step Method
Activating the Yeast
First, you need to wake up the active dry yeast so that it can do its job of making the dough rise and create those lovely air pockets. Take a small clean mixing bowl and pour in one cup of warm water, making sure the water is not too hot because high heat will kill the yeast, and not too cold because cold water will not wake it up. A good rule is that the water should feel like comfortable bath water when you dip your finger into it. Add one teaspoon of white granulated sugar into the warm water and stir it gently with a small spoon until the sugar crystals dissolve completely. Next, sprinkle the two teaspoons of active dry yeast evenly across the top of the sweet water and give it one very gentle stir. Leave the bowl completely alone on your counter top for about ten minutes so the yeast can feed on the sugar and begin to activate. After ten minutes have passed, you should see a thick, frothy, and foamy layer forming on top of the water, which tells you that the yeast is alive, healthy, and completely ready to help your bread expand.
Mixing the Dough
Second, while your yeast is growing nice and foamy, you can prepare the dry base for your flatbread dough in a separate area. Take a very large mixing bowl and add three cups of all purpose white flour along with one teaspoon of fine sea salt. Use a dry whisk or a large spoon to stir the flour and salt together thoroughly so that the salt is distributed evenly throughout the entire bowl. Once the dry ingredients are mixed, use your fingers or a spoon to press a large hollow well right in the very center of the flour, making it look like a little bowl inside the bowl. Now, take your foamy yeast mixture and pour it directly into that hollow well you just created in the center of the flour. Add two tablespoons of pure olive oil right on top of the liquid mixture to give the bread a wonderful softness and a rich flavor. Use a sturdy wooden spoon to gently start drawing the flour from the inner walls of the well into the liquid, stirring slowly in a circular motion. Keep stirring patiently as the dry flour absorbs all the liquid, and you will see the mixture gradually transform from a loose powder into a shaggy, clumpy, and sticky dough.
Kneading by Hand
Third, once the dough has formed a clumpy ball that pulls away from the sides of the bowl, it is time to begin the wonderful process of kneading. Dust a clean, flat counter top or a large wooden cutting board with a thin, even layer of extra flour so that the sticky dough does not glue itself to the surface. Turn the shaggy dough ball out onto the floured surface and use your hands to gather any loose bits of flour left behind in the bowl. To knead the dough, push the ball firmly away from you using the heels of your palms, stretching the dough out smoothly across the counter top. Fold the top edge of the stretched dough back over toward you, give the entire ball a quarter turn, and push it away with your palms once again. Repeat this rhythmic motion of pushing, folding, and turning continuously for about eight to ten minutes without stopping. As you keep working, you will notice a magical transformation happening beneath your hands as the dough becomes less sticky, much smoother, and highly elastic. To test if it is ready, press your thumb gently into the dough ball, and if the indentation springs back quickly, you know you have kneaded it perfectly.
The First Dough Rest
Fourth, you must give the dough time to rest and expand so that it can develop a light texture and plenty of inner air. Take a clean large bowl and wipe a small drop of olive oil all over the inside walls to create a slippery surface that prevents sticking. Place your beautifully smooth dough ball directly into the oiled bowl and turn it over once so that the top of the dough is also lightly coated in oil. Cover the top of the bowl tightly with a clean piece of plastic wrap or a damp kitchen towel to keep the moisture inside and prevent a dry crust from forming on the dough. Move the covered bowl to a warm, cozy, and draft free spot in your kitchen, such as inside an turned off oven or near a warm appliance. Let the dough rest completely undisturbed for about one hour to one hour and thirty minutes, depending on how warm your kitchen happens to be. During this resting period, the yeast will produce gas bubbles that expand the dough, causing it to double in size and look incredibly light, puffy, and full of life.
Dividing and Shaping
Fifth, after the resting time is complete, carefully remove the cover and enjoy the beautiful sight of your risen, fluffy dough. Gently press your fist right into the center of the expanded dough to release the trapped air bubbles, which is a very fun and satisfying step known as punching down the dough. Turn the deflated dough back out onto your lightly floured counter top and shape it into a long, even log shape using your hands. Take a sharp knife or a plastic bench scraper and cut the log into eight equal pieces so that all your flatbreads cook at the exact same rate. Take each individual piece of dough and roll it between your palms to form a smooth, tight, round little ball. Place the eight dough balls in a neat row on your counter top and cover them loosely with your kitchen towel so they do not dry out while you work. Let these small balls rest for about ten minutes, which allows the gluten in the dough to relax, making it much easier for you to roll them out without the dough shrinking back.
Rolling into Circles
Sixth, take one rested dough ball at a time and place it in the center of your floured work surface while keeping the remaining balls covered. Dust your rolling pin with a tiny bit of flour and begin rolling the ball from the center outward, applying gentle and even pressure. Roll the dough into a flat, round circle that is about six inches wide and roughly one quarter of an inch thick all the way around. It is very important to make sure that the thickness is completely even across the entire circle, without making the edges too thin or the center too thick. If you roll the dough too thin, it will become crispy like a cracker instead of puffing up, and if you roll it too thick, it will stay dense and heavy. Be very careful not to puncture, scratch, or tear the dough with your fingers or the rolling pin, because any tiny hole will let the steam escape during cooking, preventing the pocket from opening. Lay the smooth flat circle on a piece of parchment paper and repeat this rolling process with the rest of the dough balls.
The Cooking Process
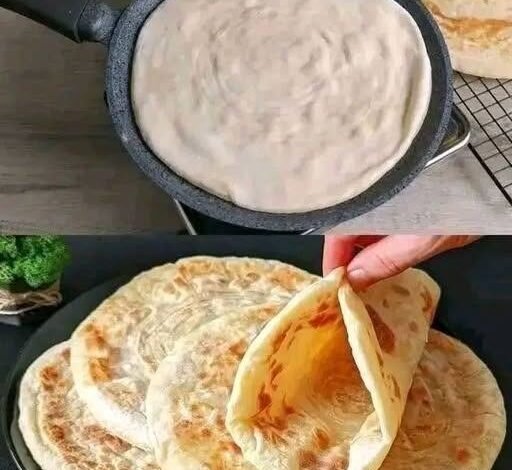
Seventh, you are now ready to experience the most exciting part of the recipe where the flatbread magically inflates into a beautiful balloon. Place a heavy cast iron skillet or a non stick frying pan over medium high heat on your stove top and let it get very hot for about five minutes. Do not add any oil or butter to the pan because dry, intense heat is the secret key to creating the steam that blows up the pocket. Carefully lift one flat dough circle and lay it flat into the center of the hot, dry pan, listening for a gentle sizzle. Let it cook undisturbed for about thirty seconds, and you will see tiny bubbles starting to form on the top surface while the bottom gets lightly pale. Flip the flatbread over to the second side using a wide spatula and let it cook for another one minute, during which you will see it begin to puff up dramatically. Flip it back to the first side one last time, and watch in amazement as the bread inflates completely into a round, hollow ball filled with hot steam.
Cooling and Storing
Eighth, once the flatbread is fully puffed and has developed beautiful golden brown spots on both sides, carefully remove it from the hot pan using your spatula. Immediately transfer the hot bread to a clean basket or a plate lined with a clean kitchen towel, and fold the towel over the top to trap the heat. Keeping the cooked flatbreads wrapped in a warm towel is an essential step because the trapped steam keeps the crust incredibly soft, pliable, and easy to bend instead of letting it become hard or dry. Repeat the cooking process for the remaining dough circles, stacking them neatly on top of each other inside the warm towel as they finish. Allow the flatbreads to cool down for a few minutes until they are safe to handle with your bare hands. When you are ready to eat, simply use a sharp knife to cut a flatbread in half, and you will see a perfect, clean, and hollow pocket inside that is completely ready to be stuffed with your favorite delicious ingredients.
Why This Recipe Is Special
This pocket flatbread recipe is truly special because it combines the simplicity of ancient baking methods with a wonderful eating experience that brings joy to any meal. The texture is a magnificent balance of a slightly chewy exterior and an incredibly soft, delicate interior that melts in your mouth with every bite. Because it contains absolutely no artificial additives, milk products, or animal fats, it is a naturally vegan bread that almost anyone can enjoy regardless of their dietary choices.
The health points of this homemade version are outstanding compared to anything you buy at a store, as you are using clean olive oil which provides heart healthy monounsaturated fats. You also use a very controlled amount of salt, which helps you manage your daily sodium intake much better than eating commercial baked goods that are loaded with hidden sodium. The taste is remarkably clean, earthy, and lightly tangy from the yeast, providing a neutral yet delicious base that complements both sweet and savory fillings beautifully. It gives you a deep sense of accomplishment to see a simple ball of flour and water puff up into a perfect sandwich pocket right before your eyes.
Extra Tips for Better Taste
If you want to elevate the flavor of your flatbreads to an even higher level, you can introduce different herbs and spices directly into the dough during the mixing stage. Try adding one teaspoon of dried rosemary, garlic powder, or onion flakes to the flour mixture before you pour in the wet ingredients to create a wonderful savory aroma. You can also brush the outside of the warm flatbreads with a mixture of melted plant butter, crushed fresh garlic, and finely chopped parsley immediately after they come out of the cooking pan.
For a healthier whole grain alternative, you can replace one cup of the all purpose white flour with one cup of whole wheat flour, which adds a lovely nutty flavor and extra dietary fiber. Always make sure your cooking pan is completely hot before dropping the dough in, because a cold pan will result in flat, dense bread without any pocket at all. If a flatbread is struggling to puff up in the pan, you can gently press a clean rolled up towel onto the areas where the air is escaping to force the steam to spread inside.
Final Thoughts
Baking fresh pocket flatbread at home is a deeply rewarding journey that transforms simple, everyday ingredients into an extraordinary culinary treat full of warmth and love. It shows you that you do not need to be a professional chef or have a fancy kitchen to create beautiful, soft, and delicious bread from scratch. This simple recipe is highly forgiving and provides the perfect introduction for beginners who want to build confidence in working with yeast and dough. I highly encourage you to gather your ingredients, clear off your kitchen counter, and enjoy the magical process of watching your own flatbreads puff up on the stove. Share them warm with your family, fill them with fresh vibrant ingredients, and cherish the wonderful satisfaction of feeding your loved ones with clean, homemade food.
Nutrition Details
Here is a clear breakdown of the basic nutritional components found in a single serving of this homemade flatbread. The values listed below are calculated for one individual flatbread out of the eight total pieces made from this recipe.
Disclaimer
Please keep in mind that every single human body has its own unique metabolism, digestive system, and nutritional requirements, meaning that individual health responses to specific foods can vary from person to person. The nutritional values provided in this article are general estimates intended for educational and informational purposes only and should not be taken as exact science. If you have specific dietary restrictions, health conditions, or allergies to gluten, you should always consult with a qualified doctor or a registered dietitian before making significant changes to your daily eating habits.