Making a cold, creamy dessert at home is one of the most exciting kitchen projects you can undertake, and this wonderful recipe for a homemade chocolate frosty is going to completely change the way you satisfy your sweet tooth forever. This recipe is all about recreating that incredibly famous, thick, and velvety fast food frozen treat right in the comfort of your own kitchen without needing any expensive commercial ice cream makers or special machinery. It is a brilliant blend of a rich chocolate milkshake and a soft scoop of premium ice cream, resulting in a unique texture that is thick enough to eat with a spoon but smooth enough to sip through a thick straw. By using basic, honest ingredients that you can easily find at your local neighborhood grocery store, you can achieve a wonderfully thick consistency and an intense cocoa flavor that tastes remarkably like the drive through original version. It is an ideal recipe for complete kitchen beginners because the process is entirely straightforward, foolproof, and takes less than ten minutes of actual preparation time from start to finish. Learning this simple recipe gives you the power to whip up a decadent, chilly dessert on a whim, allowing you to control the quality of the ingredients while bringing immense joy to your family.
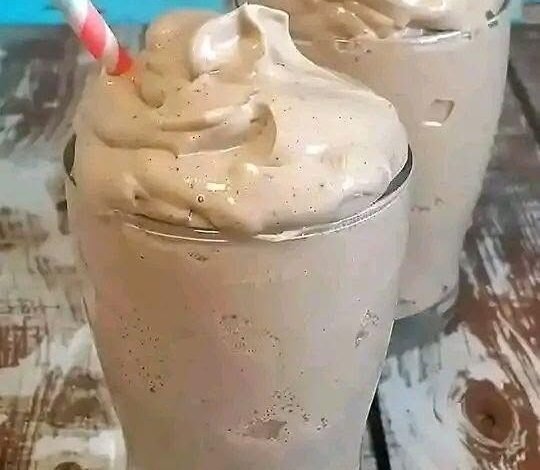
People all over the world are absolutely obsessed with this specific type of frozen treat because it delivers a nostalgic comfort that instantly transports you back to happy childhood memories and carefree summer days. The primary reason for this universal love is the magical texture, which manages to be incredibly dense, silky, and icy cold all at the exact same time without feeling heavy or overly greasy on your tongue. Traditional milkshakes can sometimes turn into a watery liquid too quickly, while standard hard scoop ice cream can be too firm to enjoy immediately, but this special blended creation stays perfectly spoonable and thick for a very long time. Kids and adults alike fall in love with the beautiful pale brown color and the glossy finish of the mixture as it is swirled high into a clear glass mug. People also adore how cost effective and convenient this homemade version is because it eliminates the need to pack up the car, drive through heavy traffic, and stand in long fast food lines just to satisfy a sudden evening sugar craving. It brings a festive, happy atmosphere into your kitchen, turning an ordinary day into a special celebration where everyone gathers around the kitchen blender with big smiles and empty spoons.
You should definitely choose to make this magnificent frozen dessert whenever you find yourself needing a genuine moment of emotional comfort, relaxation, or a playful reward after a long and exhausting week of hard work or study. It is the absolute perfect beverage to prepare during hot summer afternoons when the sun is blazing outside and you need a super chilled, decadent treat to quickly cool down your body temperature and lift your spirits. You can also mix up a large batch of this chocolate creation when you are hosting casual backyard barbecues, fun family movie nights, or children birthday parties where you want to impress your guests with a classic favorite made completely from scratch. From a pure taste perspective, it is a wonderful way to satisfy a deep, intense craving for rich cocoa and sweet cream without having to consume a mountain of artificial preservatives or strange chemical thickeners often found in commercial tubs. The simple act of measuring the liquids, watching the blender spin them into a thick vortex, and pouring the velvety smooth mixture into cold glasses creates an instant feeling of culinary pride and domestic happiness.
In addition to the wonderful emotional satisfaction and the incredible flavor experience, this simple homemade recipe is a fantastic tool for anyone who wants to enjoy a rich dessert while managing a clean and structured lifestyle. When you order a similar frozen dessert at a fast food window, you are often consuming massive quantities of high fructose corn syrup, processed artificial oils, and stabilizers designed to keep the food frozen on a truck for months. By taking charge of the preparation in your own home, you gain complete transparency and total control over the exact nature of the dairy, the source of the sweetness, and the intensity of the real cocoa powder entering your body. If you are focused on physical fitness goals or working through a strict workout routine, you can easily adapt this versatile base by selecting low fat dairy options or incorporating your favorite clean protein powders to create a muscle building recovery shake. It proves beautifully that you can honor your body health choices and maintain your fitness dedication while still allowing your inner child to celebrate the rich, creamy, and joyful sweetness of a classic chocolate treat.
Ingredients You Will Need
To begin this easy blending adventure, you will need to gather a few simple, cold ingredients from your refrigerator and kitchen pantry. Please make sure your liquid dairy items are thoroughly chilled before you start so your finished treat achieves the highest level of thickness.
-
Two cups of premium whole chocolate milk
-
one cup of heavy whipping cream
-
One half cup of sweetened condensed milk
-
Three tablespoons of unsweetened Dutch processed cocoa powder
-
One teaspoon of pure vanilla extract
-
Two cups of clean solid ice cubes
Step by Step Method
Chilling Your Glassware
First, you want to perform a clever chef trick that keeps your frozen dessert from melting too quickly once it is served to your family. Take your clean glass mugs or serving tumblers and place them directly into the coldest part of your freezer for about fifteen minutes before you begin mixing. This step ensures that the glass walls become thoroughly frosted and icy cold, which helps maintain the unique thick and velvety texture of your chocolate treat from the very first spoonful down to the final sip.
Measuring the Liquids
Second, clear a clean workspace on your kitchen counter top and set up your standard high speed kitchen blender securely on its base. Pour exactly two cups of premium whole chocolate milk and one cup of cold heavy whipping cream directly into the clean blender jar. The combination of the rich chocolate milk and the heavy cream provides the essential fat content that is absolutely required to create a dense, luxurious mouthfeel that perfectly mimics the fast food original version.
Adding the Sweetness
Third, take your one half cup of sweet condensed milk and pour it slowly into the blender jar right on top of the cream mixture, using a silicone spatula to scrape out every single drop from your measuring cup. Sweetened condensed milk is a secret power ingredient because it contains very little water, which means it sweetens the dessert beautifully while contributing to a sticky, thick, and ultra smooth body that regular granulated sugar simply cannot replicate.
Enhancing the Cocoa Flavor
Fourth, measure out three tablespoons of unsweetened Dutch processed cocoa powder and add it carefully to the liquid ingredients in the blender jar. Adding extra cocoa powder is an essential step because the dairy products are very rich and can easily mask the chocolate taste, so the raw cocoa ensures the final product has a deep, authentic, and dark chocolate punch. Pour in one teaspoon of pure vanilla extract right after the cocoa powder to enhance the natural sweetness and add a beautiful aromatic depth to the batter.
Introducing the Ice
Fifth, take your two cups of clean solid ice cubes from your freezer and drop them gently into the liquid mixture inside your blender jar. It is important to use solid, hard ice cubes rather than crushed ice because the hard cubes will force the blender blades to work harder, crushing the ice particles down into a microscopic size that creates a thick frost rather than a watery slush. Secure the blender lid tightly onto the jar to prevent any accidental splashes or messy kitchen cleanups.
Blending into a Vortex
Sixth, turn your kitchen blender onto a low speed setting for about twenty seconds to break down the large ice cubes into smaller, manageable fragments. Once the loud crunching sound starts to fade, increase the blender speed to high and let it run continuously for about one full minute. Watch through the clear blender jar as the ingredients form a powerful vortex, pulling the ice and thick cream down into the spinning blades until the mixture looks completely uniform, thick, and beautifully smooth.
Checking the Consistency
Seventh, turn off the blender completely, remove the lid, and dip a large kitchen spoon deep into the center of the chocolate mixture to check the overall thickness. The treat should cling heavily to your spoon and hold its shape for a few seconds rather than sliding off like a traditional thin milkshake. If you notice any tiny unblended ice chunks remaining at the bottom, replace the lid and blend on high speed for an additional thirty seconds until the texture is perfectly velvety and flawless.
Serving Your Creation
Eighth, carefully remove your frosted glass mugs from your freezer and set them flat on your counter top. Pour the thick, luxurious chocolate mixture evenly into the cold glasses, watching it stack up in beautiful, dense layers that hold their form. Serve this magnificent frozen dessert immediately with a long metal spoon and a wide straw, allowing everyone to dig into the rich, velvety layers while the treat is at its absolute peak of icy cold perfection.
Why This Recipe Is Special
This homemade chocolate frosty recipe is uniquely special because it achieves a legendary texture and a profound flavor balance without relying on artificial chemicals or commercial ice cream equipment. The texture is a magnificent triumph of home blending, offering a silky smoothness that feels incredibly expensive and luxurious on the tongue while maintaining a playful, icy thickness that is deeply satisfying to eat. The flavor profile is far superior to store bought alternatives because it uses real cocoa powder and pure vanilla extract, which cuts through the heavy sweetness of the condensed milk to deliver an authentic, adult approved chocolate taste.
From a health and wellness perspective, this recipe is outstanding because it completely eliminates the need for hydrogenated oils, artificial colorings, and chemical emulsifiers like carrageenan, which are standard ingredients in fast food variations. By preparing this dessert in your own kitchen, you ensure that every calorie comes from real, recognizable dairy and clean ingredients that your body can easily understand and digest. It provides a good source of dietary calcium and protein from the fresh milk and cream, making it a more substantive and nourishing treat for growing children. It brings pure, nostalgic luxury to your dining table while giving you total peace of mind regarding the purity and safety of what your family is eating.
Extra Tips for Better Taste
If you want to elevate the flavor of your homemade frozen treat to a spectacular new level, you can try adding a tiny pinch of fine espresso powder or instant coffee granules to the blender during the mixing stage. A tiny bit of coffee will not make the dessert taste like coffee at all, but it acts as a magical flavor enhancer that amplifies the deep notes of the cocoa powder, making the chocolate taste incredibly rich and intense. You can also experiment with textures by folding in a handful of finely crushed chocolate sandwich cookies or mini dark chocolate chips right after the blending process is finished.
For a fun twist that kids will love, try lining the inside of your frozen glass mugs with a generous swirl of homemade chocolate syrup before pouring the blended mixture inside. Always try to use Dutch processed cocoa powder rather than regular natural cocoa because the Dutch method neutralizes the natural acids in the cacao bean, resulting in a much darker color and a smoother, mellower flavor profile. If you have any leftover mixture that you cannot finish, you can pour it into plastic popsicle molds and freeze them for twelve hours to create delicious, creamy chocolate fudge pops for the following day.
Final Thoughts
Creating a thick and creamy chocolate frozen treat in your own kitchen is a simple, rapid, and incredibly joyful project that brings the fun of a classic ice cream parlor straight into your daily routine. It proves beautifully that with a standard blender and a few basic ingredients, you can easily replicate a famous global favorite with cleaner components and a much fresher taste. This straightforward recipe is absolute perfection for complete beginners because it requires no cooking over fire and delivers a flawless, crowd pleasing result in a matter of minutes. I highly encourage you to frost some glasses, turn on your blender, and enjoy the wonderful satisfaction of serving a rich, velvety chocolate treat that cools your body and warms the hearts of everyone you love.
Nutrition Details
Here is a clear and honest breakdown of the estimated nutritional elements found in a single serving of this homemade frozen chocolate treat. The values listed below are calculated for one individual glass out of the four total servings made from this recipe.
| Nutrient Type | Amount Per Single Serving |
| Calories | Three hundred and ninety calories |
| Total Fat | Twenty two grams |
| Saturated Fat | Fourteen grams |
| Sodium | One hundred and ten milligrams |
| Total Carbohydrates | Forty two grams |
| Dietary Fiber | One gram |
| Sugars | Thirty nine grams |
| Protein | Seven grams |
| Calcium | Twenty percent of daily value |
| Vitamin A | Twelve percent of daily value |
Disclaimer
Please keep in mind that every single human body has its own unique digestive system, nutritional limits, and lactose tolerance levels, meaning that individual health experiences with rich dairy desserts can vary from person to person. The nutritional values and health facts shared throughout this article are general estimates intended strictly for everyday educational and informational purposes and should never be viewed as official medical advice. If you have specific medical conditions like diabetes, severe dairy allergies, or are following a strict low calorie diet, you should always consult with your primary healthcare professional or a registered dietitian before introducing rich treats into your regular eating habits.