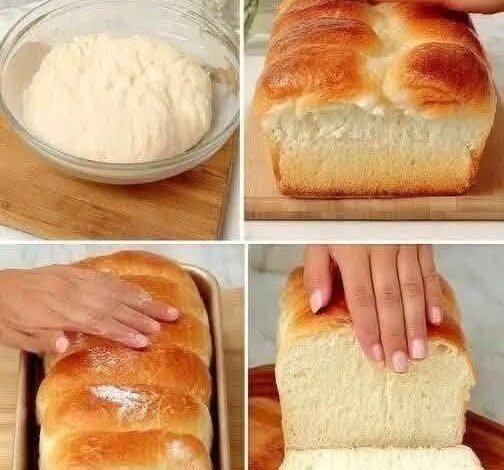
Japanese Milk Bread is a beautiful and unique creation that has taken the baking world by storm over the last few years. If you have ever walked into an Asian bakery you have probably seen these beautiful pillowy loaves that look almost too perfect to touch. This bread is famous for its incredible softness and its ability to stay fresh for days without any artificial ingredients. The secret behind this magical texture is an old Asian baking technique that involves cooking a small amount of flour and water or milk into a thick paste before adding it to the rest of the dough. This simple step changes the structure of the starch and allows the bread to hold much more moisture than a regular loaf of white bread. When you make this recipe you are not just baking a standard loaf of bread but you are creating a masterpiece that is incredibly light and fluffy like a cloud. It is the kind of bread that tears apart in beautiful feathery shreds and melts in your mouth the moment you take a bite. Once you learn how to make this at home you will likely never want to buy prepackaged sandwich bread from the grocery store ever again.
People absolutely love Japanese Milk Bread because it offers a truly unique eating experience that satisfies both the palate and the soul. In a world full of tough crusts and heavy whole grain breads this loaf stands out as a celebration of pure comfort and softness. Children adore it because it is easy to chew and has a naturally sweet flavor that pairs perfectly with almost any spread you can think of. Adults fall in love with it because it brings back fond memories of childhood comfort foods while still feeling like a premium bakery treat. The texture is so tender that it feels like you are biting into a piece of cotton candy that has been transformed into a baked good. Bakers love making it because the dough is incredibly smooth and pleasant to work with during the kneading process. There is a deep sense of satisfaction that comes from watching this dough rise up high in the pan and turn a beautiful golden brown color in the oven. It is a foolproof way to impress your family and friends since it looks and tastes like it came from a professional pastry chef.
There are so many wonderful reasons to bake this bread and it fits perfectly into almost any lifestyle or emotional moment you are experiencing. If you are having a stressful week the simple act of kneading this smooth dough can be a highly therapeutic way to calm your mind and find peace. From a taste perspective this bread is the absolute ultimate vehicle for morning toast with butter or sweet fruit jams because it crisps up beautifully on the outside while remaining soft on the inside. It is also the perfect choice for making elite egg salad sandwiches or crispy chicken katsu sandwiches since the bread compresses softly without pushing the fillings out of the sides. Even if you are mindful of your fitness goals this bread can fit into a balanced diet because it is made with pure wholesome ingredients without any strange chemical preservatives or high fructose corn syrup. Making this loaf is an act of pure love and care for your body and your family since you know exactly what went into the mixing bowl. It is the perfect weekend project to fill your whole house with the warm comforting aroma of fresh baking that makes everyone feel instantly happy and safe.
Breads like this have a rich history that shows how simple ingredients can be transformed through clever kitchen techniques into something extraordinary. The special paste used in this recipe is known to help the bread retain its moisture for a long time which means you will not have to worry about your loaf going stale by the very next day. This makes it highly practical for small households or busy people who want to bake once and enjoy great quality toast throughout the week. When you slice into the finished product you will notice a fine and uniform crumb structure that is strong enough to hold heavy sandwich fillings but delicate enough to dissolve pleasantly as you chew. The natural sweetness of the milk and sugar comes through in a gentle way that does not overpower the savory elements of your meals. It truly represents the best of both worlds in the baking universe by being both highly functional and deeply luxurious at the same time. Whether you want to upgrade your daily lunches or surprise someone special with a homemade gift this recipe will deliver joy and satisfaction in every single slice.
Ingredients You Will Need
For the special starter paste
-
Water eighty milliliters
-
Whole milk eighty milliliters
-
Bread flour thirty grams
For the main dough
-
Bread flour three hundred and fifty grams
-
Granulated sugar fifty grams
-
Instant yeast seven grams
-
Fine salt five grams
-
Whole milk one hundred and twenty milliliters
-
One large egg at room temperature
-
Unsalted butter forty grams at room temperature
For the beautiful shiny glaze
-
One large egg
-
Whole milk fifteen milliliters
Step by Step Method
Preparing the Starter Paste
First you will need to make the special starter paste which is the secret to the amazing texture of this bread. Take a small saucepan and place it on your kitchen counter. Pour the eighty milliliters of water and eighty milliliters of whole milk directly into the pan. Add the thirty grams of bread flour into the liquid mixture. Use a small whisk to stir the ingredients together until all the lumps of flour disappear completely and the liquid looks smooth. Place the saucepan over medium heat on your stove. You must stir this mixture constantly with a spatula so it does not stick to the bottom or burn. As the liquid heats up it will suddenly start to thicken into a texture that looks like smooth pudding or mashed potatoes. This process usually takes about two or three minutes. Once the mixture thickens and lines appear when you stir it remove the pan from the heat immediately. Transfer this paste into a small clean bowl. Cover the surface of the paste directly with plastic wrap so that a hard skin does not form on top. Let this paste cool down to room temperature before you use it in the main dough.
Mixing the Main Dough
Now it is time to bring the main dough together in a large mixing bowl. In your large bowl combine the three hundred and fifty grams of bread flour with the fifty grams of granulated sugar and the seven grams of instant yeast. Add the five grams of fine salt to the bowl but try to place it on the opposite side of the yeast since direct contact with salt can sometimes slow down the yeast growth. Stir these dry ingredients together with a spoon until they are well combined. In a separate small jug whisk the one hundred and twenty milliliters of whole milk with the one large egg. Make a small well or hole in the center of your dry ingredients. Pour the milk and egg mixture directly into the well. Add your cooled starter paste into the well as well. Use a sturdy spoon or your clean hands to start mixing everything together. Move the flour from the sides of the bowl into the wet center. Keep stirring until the flour absorbs all the liquid and forms a shaggy dough that sticks together.
Kneading the Dough
Turn the shaggy dough out onto a clean and dry countertop. You do not need to add extra flour to the counter because that could make the final bread dry. Start kneading the dough by pushing it forward with the heel of your hand and then folding it back over itself. The dough will feel quite sticky and messy at first but this is completely normal so do not worry. Keep kneading for about five minutes until the dough becomes slightly smoother and holds its shape better. Now take your forty grams of room temperature unsalted butter and spread it over the dough. Continue kneading the butter into the dough. This part will get very messy and slippery and it might look like the dough is falling apart. Keep pushing and folding the dough anyway. After a few minutes of continuous kneading the dough will magically absorb all the butter and become incredibly smooth elastic and shiny. Knead for another five to ten minutes until you can stretch a small piece of dough very thin without it tearing apart.
The First Rise
Shape your beautifully smooth dough into a neat round ball. Lightly grease the inside of a large clean bowl with a tiny bit of oil or butter. Place your dough ball into the greased bowl and turn it over once so the top of the dough is also lightly coated in oil. Cover the bowl tightly with a clean damp kitchen towel or some plastic wrap. Place the bowl in a warm and cozy spot in your kitchen where there are no cold drafts of air. Let the dough rest and rise for about one hour to one hour and thirty minutes. You will know it is ready when the dough has doubled in size and looks very puffy. To test it you can gently poke the center of the dough with your finger. If the indentation stays and does not spring back immediately your dough has risen perfectly and is ready for the next fun step.
Shaping the Loaf
Gently punch down the risen dough to release the large air bubbles that formed inside. Turn the dough out onto your counter and divide it into three equal pieces using a knife or a bench scraper. Shape each piece into a small smooth ball. Cover the three balls with your damp towel and let them rest for fifteen minutes so the gluten relaxes. Take one ball of dough and roll it out with a rolling pin into a long oval shape that is about twelve inches long. Fold the left third of the oval over toward the center then fold the right third over it like you are folding a letter. Roll this folded strip with your rolling pin to flatten it slightly. Now start from the short bottom end and roll the strip up tightly into a neat cylinder shape. Repeat this exact rolling and shaping process with the other two pieces of dough until you have three beautiful matching rolls.
The Second Rise
Take a standard loaf pan that measures about nine inches by five inches. Lightly grease the inside of the pan with butter or nonstick baking spray so your bread does not stick to the metal. Place the three shaped rolls of dough side by side into the bottom of the pan. They should fit snugly next to each other across the length of the loaf pan. Cover the loaf pan loosely with your plastic wrap or a damp cloth. Place the pan back in your warm spot for the second rise. Let the dough rise for about forty five minutes to one hour. During this time the rolls will expand significantly and lift up high until the top of the dough reaches just above the rim of the loaf pan. While the bread is finishing its second rise go ahead and preheat your oven to three hundred and fifty degrees Fahrenheit so it is nice and hot when the bread goes in.
Baking the Bread
In a small cup whisk your remaining large egg with fifteen milliliters of whole milk until it is completely smooth to create your egg wash. Use a pastry brush to gently paint this egg wash all over the top of the risen dough rolls. Be very gentle so you do not accidentally pop the delicate dough bubbles. This wash will give the bread a gorgeous deep golden shine as it bakes. Place the loaf pan onto the middle rack of your preheated oven. Bake the bread for about thirty to thirty five minutes. Keep an eye on the bread after twenty minutes. If the top is getting dark too quickly you can loosely tent a piece of aluminum foil over the pan to protect it. You will know the bread is fully cooked when the crust is a uniform golden brown and the loaf sounds hollow when you gently tap the top surface.
Cooling and Slicing
Remove the loaf pan from the oven carefully using oven mitts. Let the bread sit inside the hot pan on a wire cooling rack for about five minutes. This allows the structure of the bread to stabilize slightly so it does not collapse. After five minutes gently invert the pan and slide the hot loaf out onto the wire rack. Stand the bread upright and let it cool down completely to room temperature. It is very tempting to cut into hot bread right away but you must wait because the interior is still finishing its final setting process. Slicing it hot can make the bread gummy and squash the beautiful fluffy layers you worked so hard to create. Once the bread is cool use a sharp serrated bread knife to cut it into thick luxurious slices that are perfect for eating fresh or tossing into the toaster.
Why This Recipe Is Special
This Japanese Milk Bread recipe is truly special because it combines traditional science with everyday simplicity to create the ultimate comfort food. The unique cooking technique used at the beginning locks in water molecules so that your bread stays soft for days without needing chemical additives. This means your family can enjoy wholesome clean food that tastes like it came from a high end bakery without consuming mystery ingredients. The texture is unmatched by standard sandwich loaves since it offers an ultra tender crumb that melts beautifully in your mouth. It provides a wonderful balance of gentle sweetness and rich buttery undertones that elevate any meal it accompanies. Baking this loaf also brings a sense of joyful accomplishment into your kitchen as you transform humble pantry staples into a gorgeous piece of edible art.
Extra Tips for Better Taste
-
Always use fresh instant yeast to ensure your bread rises high and achieves that classic light texture.
-
Make sure your butter is truly at room temperature so it incorporates smoothly without leaving greasy pockets.
-
You can swap the water in the starter paste for extra milk if you want an even richer flavor profile.
-
Try brushing the hot crust with melted butter right after it comes out of the oven for a softer top.
-
Add a splash of honey instead of sugar if you prefer a different kind of natural sweetness in your bread.
-
Use a kitchen scale to measure your flour precisely since too much flour can make the bread heavy.
-
Keep your kitchen warm during the rising stages by placing the bowl near a warm appliance if needed.
Final Thoughts
Baking your own Japanese Milk Bread at home is a deeply rewarding journey that brings warmth and happiness into your living space. There is nothing quite like the feeling of pulling a glowing golden loaf out of your own oven and sharing it with the people you love most. This recipe is simple enough for beginners to master yet it yields results that look incredibly professional and impressive. We hope this guide inspires you to roll up your sleeves and enjoy the therapeutic process of making dough from scratch. Enjoy every single soft pillowy bite of your homemade creation.
Nutrition Details
Note: The nutrition details listed above are estimates based on a single serving size assuming the loaf is cut into twelve equal slices.
Disclaimer
Please note that everyone has unique dietary needs and individual health circumstances so individual results and nutritional impacts may change based on your specific body type. The information provided in this article is meant for educational and recreational cooking purposes only and should not replace professional medical advice. If you have specific allergies food sensitivities or health conditions it is always a good idea to consult with a qualified physician or registered dietitian. Enjoy your baking journey safely and mindfully by choosing ingredients that align well with your personal wellness goals.