There is absolutely nothing in the world of cooking that can match the pure joy of making your own fresh bread from scratch. This recipe is all about creating the ultimate batch of soft and fluffy homemade dinner rolls that will instantly fill your entire home with a warm, buttery, and heavenly aroma. If you have ever felt intimidated by the idea of baking with yeast, this is the perfect place for you to start your baking journey because we use a very simple, beginner friendly approach that guarantees success every single time. By combining basic kitchen staples like flour, milk, yeast, and real butter, you will learn how to create rolls that are so tender they practically melt in your mouth. This is not just about making a side dish for your dinner table, it is about learning a classic kitchen skill that will bring comfort, warmth, and delicious satisfaction to your family for many years to come.
People absolutely love this recipe because it delivers a level of softness and rich flavor that you simply can never buy from a local grocery store or bakery. When you pull these golden rolls out of your oven, they are incredibly light, airy, and have a beautiful, delicate crumb that stretches perfectly when you pull them apart. The top of each roll is brushed with a generous amount of melted salted butter, which creates a shiny, golden crust that is slightly sweet and wonderfully rich. Kids and adults alike will crowd around the kitchen counter just to grab one of these warm rolls while they are still steaming hot, which makes them the absolute highlight of any meal. They are also incredibly versatile, meaning you can serve them alongside a cozy bowl of soup, use them to make mini slider sandwiches, or simply enjoy them on their own with a thick smear of your favorite sweet fruit jam.
This is the perfect recipe to make when you want to bring a deep sense of warmth, love, and comfort to your family gathering or holiday celebration. From an emotional perspective, kneading yeast dough by hand is a beautiful, calming process that allows you to slow down and enjoy the simple, tactile pleasure of creating food with your own two hands. On a fitness and wellness level, making your own bread at home is a wonderful choice because it allows you to completely bypass the processed ingredients, chemical dough conditioners, and artificial preservatives found in commercial store bought breads. It gives you a clean, wholesome, and completely natural way to enjoy a comforting carbohydrate source that is made with love and high quality ingredients. Whether you are hosting a festive Thanksgiving feast, planning a cozy Sunday family dinner, or simply want to treat yourself to a delicious baking project on a rainy afternoon, these rolls will make your kitchen feel like the coziest place on earth.
There is also a wonderful culinary pride that comes from watching a simple bowl of flour and liquid rise into beautiful, puffy rounds of dough that bake into golden perfection. When you serve these rolls to your guests, the texture is so cloud like and the flavor is so rich that they will find it hard to believe you made them entirely from scratch in your own home. The gentle sweetness of the dough balances beautifully with the savory richness of the butter, making these rolls the perfect partner for any main course you choose to serve. This recipe serves as a beautiful reminder that some of the greatest pleasures in life are the ones we create ourselves with patience, care, and basic ingredients. Once you experience the magic of baking these soft, fluffy dinner rolls, you will never want to go back to buying packaged rolls from a supermarket shelf again.
Ingredients You Will Need
To create these wonderfully soft and fluffy dinner rolls, you will only need a few simple, high quality ingredients. It is very important to make sure your ingredients are fresh, especially your yeast, so that your dough rises perfectly. Here is exactly what you will need to gather:
-
Warm whole milk: 1 cup (heated to about one hundred and five degrees fahrenheit)
-
Active dry yeast: 1 packet (which is exactly two and one quarter teaspoons)
-
Granulated white sugar: 1/3 cup (this sweetens the rolls and helps activate the yeast)
-
Unsalted butter: 1/3 cup (melted and cooled slightly, plus more for brushing on top)
-
Large eggs: 2 eggs (kept at room temperature so they blend smoothly into the dough)
-
All purpose flour: 4 cups (you can also use bread flour for an even chewier texture)
-
Fine sea salt: 1 teaspoon (this balances the sweetness and enhances the buttery flavor)
Step by Step Method
Baking bread is a beautiful process that requires a little bit of patience but is actually very easy when you break it down into simple steps. Follow this guide carefully, and you will have perfect, fluffy rolls on your very first try.
Step 1: Activate the Yeast
Pour your one cup of warm whole milk into a large mixing bowl or the bowl of your stand mixer. The milk should feel like warm bath water; if it is too hot, it will kill the yeast, and if it is too cold, the yeast will not wake up. Stir in your packet of active dry yeast and one tablespoon of the granulated white sugar. Let this mixture sit undisturbed for about five to ten minutes. When you look back at the bowl, you should see a thick, bubbly, and foamy layer on top of the milk, which tells you that your yeast is alive, healthy, and ready to make your bread rise.
Step 2: Combine the Wet Ingredients
Once your yeast is bubbly, add the remaining granulated white sugar, the melted unsalted butter, and your two room temperature eggs to the bowl. Use a whisk or the paddle attachment of your mixer to blend these ingredients together gently until the eggs are fully broken up and the liquid looks smooth and uniform.
Step 3: Add the Flour and Salt
Add three cups of your all purpose flour and the fine sea salt to the wet ingredients. If you are using a stand mixer, attach your dough hook and turn it on to a low speed. If you are mixing by hand, use a sturdy wooden spoon to stir the mixture. Mix until a shaggy, sticky dough begins to form. Gradually add the remaining one cup of flour, a few tablespoons at a time, until the dough pulls away from the sides of the bowl. The dough should still feel slightly tacky to the touch, but it should not be so sticky that it clings to your fingers in large clumps.
Step 4: Knead the Dough
Turn the dough out onto a lightly floured clean surface on your kitchen counter. Knead the dough by pushing it down and away from you with the heels of your hands, then folding it back over itself and rotating it a quarter turn. Repeat this rhythmic motion for about eight to ten minutes by hand, or let your stand mixer knead it on low speed for about five to six minutes. You will know the dough is fully kneaded when it becomes completely smooth, stretchy, and holds its shape in a neat, round ball.
Step 5: The First Rise
Grease a large, clean bowl with a quick spray of cooking oil or a smear of melted butter. Place your beautiful ball of dough into the greased bowl, then turn it over once so the top of the dough is also lightly greased. Cover the bowl tightly with plastic wrap or a damp, warm kitchen towel. Place the bowl in a warm, draft free spot in your kitchen and let the dough rise for about one hour to one hour and thirty minutes, or until it has clearly doubled in size.
Step 6: Shape the Rolls
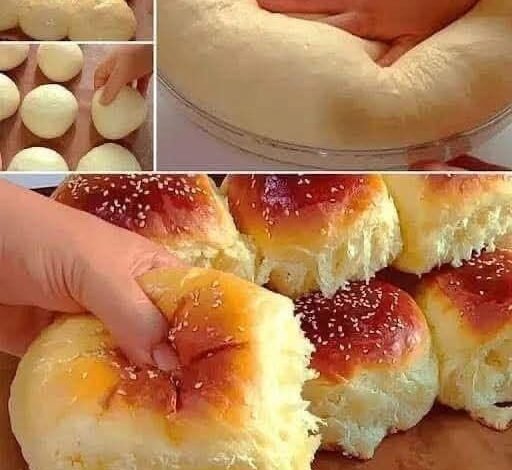
Once the dough has risen, gently press your fist into the center of the dough to deflate it. Turn the dough out onto your counter and use a knife or a bench scraper to divide the dough into fifteen equal pieces. To shape each piece into a perfect, smooth roll, cup your hand over a piece of dough on the counter and move your hand in a gentle circular motion, keeping the bottom of the dough in contact with the counter. This action will stretch the top of the dough into a beautiful, tight, and smooth dome.
Step 7: The Second Rise
Grease a nine by thirteen inch metal or glass baking pan with plenty of butter. Place your fifteen shaped rolls into the greased pan in three neat rows of five rolls each. They should be spaced out slightly, but they will touch each other as they rise and bake, which is exactly how we get those lovely, soft pull apart edges. Cover the pan loosely with a clean kitchen towel and let the rolls rise for a second time for about thirty to forty five minutes until they look puffy and are touching each other gently.
Step 8: Bake to Golden Perfection
While your rolls are rising for the second time, preheat your oven to three hundred and fifty degrees fahrenheit. Once the rolls are puffy, remove the towel and place the pan on the center rack of your oven. Bake the rolls for twenty to twenty five minutes until the tops are a deep golden brown color. The moment you remove the hot rolls from the oven, immediately brush the tops generously with melted salted butter. Let them cool in the pan for ten minutes before serving them warm at your dinner table.
Why This Recipe Is Special
This recipe is incredibly special because it brings the timeless, comforting tradition of old school baking right into your modern kitchen with absolute ease. In our busy world, we often rely on packaged convenience foods that are made quickly in massive factories, which means we miss out on the incredible taste and satisfaction of slow food made with care. When you take the time to bake these dinner rolls, you are creating a truly premium product that contains zero chemicals, zero high fructose corn syrup, and zero hidden preservatives. It is a beautiful, clean way to share a delicious meal with the people you care about most.
From a texture and taste standpoint, this recipe is a masterpiece. By using whole milk, real butter, and fresh eggs, we enrich the dough with natural fats that coat the flour proteins, which prevents them from forming tough gluten strands. This enrichment process is the scientific secret behind why these rolls turn out incredibly soft, pillowy, and tender, rather than tough and chewy like a standard crusty French baguette. The butter on top adds a brilliant, glossy sheen and a rich savory finish that contrasts beautifully with the very light, delicate sweetness of the bread itself.
Extra Tips for Better Taste
If you want to customize your homemade dinner rolls and explore new flavors, here are a few creative and fun tips you can easily try in your kitchen:
-
Incorporate fresh herbs: Try stirring a tablespoon of finely chopped fresh rosemary, thyme, or chives directly into the dry flour before mixing the dough to add a beautiful herbal fragrance to your rolls.
-
Add a touch of honey: You can easily swap out the white sugar for an equal amount of raw honey to give the rolls a beautiful, rich floral sweetness that pairs amazingly well with salted butter.
-
Sprinkle with sea salt flakes: Right after you brush the hot rolls with melted butter, sprinkle a tiny pinch of flaky sea salt on top to create an incredible sweet and salty flavor experience.
-
Make them cheesy: Gently flatten each piece of dough during the shaping step, place a small cube of sharp cheddar cheese in the center, then wrap the dough back around it and roll it into a ball to create amazing cheese stuffed rolls.
-
Keep your oven moist: Place a small metal pan filled with a cup of hot water on the bottom rack of your oven while the rolls bake to create a gentle steam, which helps keep the crusts incredibly soft and tender.
Final Thoughts
Baking your own fresh bread at home is a beautiful, rewarding journey that brings a wonderful sense of warmth and accomplishment to your daily cooking routine. These soft and fluffy dinner rolls are a classic recipe that is perfect for beginners, yet they deliver a professional, gourmet result that will make everyone at your table feel deeply cared for. We hope this simple, step by step guide inspires you to turn on your oven, feel the soft dough in your hands, and enjoy the absolute magic of hot, buttery bread fresh from your own kitchen.
Nutrition Details
This table shows the approximate nutritional values for one single homemade dinner roll. This recipe makes a total of fifteen rolls.
| Nutrient | Amount Per Serving (1 Roll) |
| Calories | 185 calories |
| Total Fat | 6 grams |
| Saturated Fat | 3.5 grams |
| Sodium | 190 milligrams |
| Total Carbohydrates | 28 grams |
| Dietary Fiber | 1 gram |
| Sugars | 5 grams |
| Protein | 4.5 grams |
Disclaimer
Please keep in mind that everyone has a completely unique body, and how we digest and process different foods can change from person to person. While homemade yeast bread is a wholesome, delicious, and natural comfort food, it does contain wheat gluten and dairy products, which are important considerations for anyone with specific food sensitivities or allergies. If you are trying yeast bread or making significant changes to your daily nutrition habits, it is always a wise and gentle approach to enjoy moderate portions to see how your stomach feels. Always consult with your personal doctor or a qualified nutrition professional if you have any questions about how specific ingredients fit into your personal lifestyle.